Web-Based Systems
This site contains transitional material, aimed at helping you prepare for the next major topic (User Interfaces & Human-Computer Interaction).
We provide an introduction to HTML and CSS here, for those unfamiliar with these technologies. You can skip over this material if you already have web development experience.
We also provide an introduction to the server side of web applications, with a particular focus on the Ktor framework. Again, there may be things here that you can skip because you already know them, but as a minimum you should work through the material on Ktor.
If you’ve not already done so, please bookmark this site in your web browsers, so that you have convenient access to it in future.
There is no GitHub repository to support this material, and therefore no reason to use Codespaces.
Instead, you should do the tasks on the SoCS Linux machines or your own PC. If you attempt to use a Codespace, you will actually make things more difficult for yourself!
Credits
This material was written by humans.
Please report any errors via the General channel for COMP2850 in Microsoft Teams.
HTML
HTML, HyperText Markup Language, is the foundational technology of the web. It provides a way of defining the structure of resources that are primarily text-based, with the option of including other types of media such as images and video. It also provides simple ways of making those resources interactive—e.g., via forms.
In this section, we review the format of HTML documents and consider examples of how to structure different types of information. We do not provide an exhaustive survey of all the different elements that can appear in an HTML document; instead, we give some examples of the most important elements, along with pointers to where you can find out more.
Note also that we focus exclusively on the latest ‘living standard’ for HTML here. We do not consider older versions, nor do we discuss the history of their development.
Document Structure
Example
Here’s an example of how a modern1 HTML document is typically structured:
<!doctype html>
<html lang="en">
  <head>
    <!-- document metadata specified here -->
  </head>
  <body>
    <!-- visible content specified here -->
  </body>
</html>
It begins with a document type declaration (DTD). This indicates to the browser that what follows is a standards-compliant HTML document, and it should adjust the way that it renders the document accordingly. Without a DTD, the browser will render content in so-called quirks mode, emulating the behaviour of older browsers in the days before web standards were followed properly.
After the DTD comes a single html element. This is known as the
‘root element’ of the document.
All elements in an HTML document are specified using tags. In some cases
a single tag is used to specify an element, but in most cases, like this one,
there is an opening tag and a closing tag. Closing tags are distinguished
from opening tags by the use of the / character as a prefix.
The opening tag of the html element is <html>, and the closing tag is
</html>.
Notice that, in this example, the opening tag also specifies an attribute.
Attributes have a ‘key=value’ syntax, and they are often optional. In this
case the lang attribute is used to declare that the document’s language
is English.
Specifying a language explicitly is necessary for accessibility.
The lang attribute declares to screen readers which language they should
use when announcing the content of a document.
The html element encloses two elements: head, which supplies
document metadata of various kinds; and body, which encloses the
visible content of the document. The former is discussed in more detail
below.
Document Head
Here’s an example of how a head element is typically defined:
<head>
  <meta charset="UTF-8">
  <meta name="viewport" content="width=device-width, initial-scale=1">
  <link rel="stylesheet" href="/static/style.css">
  <title>Document Title</title>
</head>
meta
At a minimum, an HTML document should specify the character encoding
using a meta element. UTF-8 is the most commonly-used encoding, but
others may be more appropriate, depending on the language in which the
document contents are written.
It is also common to use meta for viewport sizing. This is needed
to ensure that a site is rendered appropriately on mobile devices.
The name and content attributes can be used to specify arbitrary document
metadata. For example, you could identify the author of a document with
<meta name="author" content="John Smith">
Note that meta is specified using a single tag; it doesn’t have separate
opening and closing tags. Single tags originally needed to end with />, but
this is no longer required.
title
At a minimum, an HTML document should also provide a title for the document,
using a title element. This title will be shown by the browser tab
in which the document is displayed, and will be announced by screen readers.
The contents of a title element will not be displayed within the document
itself; for that, you will need to use the h1 element.
link
Often, HTML documents need to be linked with external resources that are
needed in order to render them properly. Typically, link will be used
to reference an external stylesheet containing the CSS rules that apply to
the document2, as in the example above.
The link element can also be used to associate icons with a web page.
These icons will be displayed in a browser tab, or on the home screen of a
mobile device.
-
by ‘modern’ here, we mean ‘compliant with the HTML living standard’. ↩
-
It is also possible to embed CSS rules within the document itself, but putting them in a
styleelement inside thehead. This approach can even be combined with the use of an external stylsheet. ↩
Body Elements
In this section, we review the elements most commonly found within the body
element of an HTML document. Forms are covered separately.
There are many other elements that you can use in HTML documents!
You can consult resources such as the Mozilla HTML Element Reference for details of elements not mentioned here.
Text
The p element organises text into paragraphs. Within a paragraph,
you can put emphasis on text using the em element, or add stronger
emphasis with the strong element:
<p>This is a paragraph, which gives some <em>emphasis</em> and some
<strong>strong emphasis</strong> to its text.</p>
Note that em and strong signify different degrees of emphasis, but
they do not specify how that emphasis should be achieved. This is an
example of semantic markup, whereby HTML elements focus on giving meaning
to different parts of a document, rather than dictating their appearance.
Browsers typically default to using italics for emphasis and bold for strong emphasis, but this can be overridden using CSS. Screen readers will adopt non-visual approaches when encountering these elements, e.g., altering the voice used to read the document content.
HTML also has the i and b elements, which are often confused with
em and strong.
Please see the HTML Element Reference for discussion of how these elements differ and how they should be used.
Lists
Lists of items can be unordered (ul) or ordered (ol). In
each case, list items are represented using the li element.
Browsers will default to using bullets for the items in an unordered list and an ascending sequence of numbers for items in an ordered list. You can use CSS to specify something other than the default.
Ordered lists support a numeric attribute named start, which can be used
to set the number of the first item in the list:
Hyperlinks
Hyperlinks are created using the a (anchor) element. A hyperlink can
be made to another part of the same document, or to an external document, or
to other kind of resource. The target is specified using the href attribute.
The value given to this attribute is typically a URL.
Here’s a simple example:
In COMP2850, we will use the <a href="https://kotlinlang.org/">Kotlin
programming language</a> to build applications.
Here, ‘Kotlin programming language’ is the clickable ‘anchor text’.
Typically, browsers default to rendering the anchor text in blue and underlining it, but the style of hyperlinks is fully customizable using CSS.
For accessibility, it is important that anchor text gives some kind of indication of what the document is linking to. Phrases like “click here” are NOT suitable as anchor text. Assistive software will often collect all of the links in a document into one place for easy navigation, so the anchor text has to still be meaningful when isolated from the rest of the document.
Images
Images can be introduced into a document using the img element.
This has a required attribute, src, which provides a path to the image
file. This can be a local path or a full URL pointing to an external
resource. Browsers are capable of handling a variety of image formats, but
PNG and JPEG are the ones most frequently used.
Accessible documents will also require the alt attribute. This is used to
provide some descriptive text for an image, which can be read out by screen
readers. If an image is included for decorative purposes only and has no
real meaning in the document, then you should use alt="". This signals to
a screen reader that it can be ignored.
Here’s an example:
<img src="leedsmap.png" alt="A map of Leeds city centre">
It can be useful to specify image width and height (in pixels) using the
width and height attributes. When you do this, the browser is able to
calculate how much space will be needed to display an image before it has
been fully loaded. This will avoid layout shifts when the image is finally
rendered on screen.
Headings
HTML supports six different levels of section heading, using elements
h1, h2, etc, through to h6.
Browsers typically default to rendering headings in boldface at varying sizes,
with h1 being significantly larger than the base font size and lower level
headings getting progressively smaller, but all of this can be overridden
using CSS.
There should be only one h1 heading in a document. Headings should have
proper nesting, with no skipping of levels (e.g., don’t jump from
h2 to h4).
This is necessary in order for documents to be accessible.
If these rules are followed, then screen readers will be able to determine document hierarchy and navigate the document in a sensible way.
Other Structure
A range of other elements exist that can impose more structure on an HTML
document. For example, you can enclose the main content inside a main
element and represent a sidebar containing navigation links using a
nav element.
Some documents act as a list of relatively self-contained pieces of content.
For example, a document might contain short reviews of a movie by different
reviewers. Each of these mini-reviews can be represented using the
article element. Within an article, you can have header
and footer elements, above and below the main content. The header
might contain a short title for the review, whereas the footer might
contain the name and contact details for the reviewer.
There is also a more generic section element, which can be used in
places where main, nav and article are not appropriate.
When used sensibly, these structural elements can help assistive technologies with navigating document content.
div and span
The aforementioned structural elements provide semantic markup: they give specific meaning to different sections of the document.
By contrast, the div and span elements have no inherent
meaning. Instead, they are used to mark particular parts of a document so that
those parts can be targeted by CSS rules or by JavaScript.
For example, a website providing food recipes might use markup like this:
<p>To make your own pesto, you will need
  <span class="ingredient">basil</span>,
  <span class="ingredient">pine nuts</span>,
  <span class="ingredient">garlic</span> and some good
  <span class="ingredient">olive oil</span>.</p>
This code labels each of the recipe ingredients with the document class
ingredient. A stylesheet can provide CSS rules specific to this document
class, thereby ensuring that recipe ingredients are all formatted in
a specific way.
As another example, a document might have a div element like this:
<div id="search-results"></div>
This will be empty, and therefore invisible, when the document is initially
rendered by a browser. The document might also have a search form on it
that submits a search term asynchronously to some code running on the server.
This code will do a database query to obtain some search results. These
search results can then be inserted into the div element with the given
ID. (You’ll learn more about how this works when we cover htmx later.)
Task 1.2
Create a new file named simple.html on your local machine (not in a
Codespace). In this file, write a simple HTML document that contains
headandbodyelements, as described previously- At least two levels of heading
- A few paragraphs of text, including examples of emphasis and hyperlinks
- Some examples of other features, as you prefer
Don’t do any styling with CSS.
The Mozilla Developer Network has a Playground for experimenting with HTML, CSS and JavaScript. You can use this an alternative to creating a local file if you wish.
Be aware that this environment has some limitations - e.g., you won’t be able to include images, and clicking on hyperlinks won’t work.
Further Reading
MDN hosts a comprehensive collection of resources for web developers.
We’ve already mentioned the HTML reference, but they also provide in-depth tutorials, e.g., on structuring content using HTML.
Forms
HTML documents can use forms to send data back to a server.
A form is introduced using the form element. This has two important
attributes: action and method.
The action attribute provides a URL to server-side code that will process
the form data. The method attribute specifies which HTTP method will
be used to submit the data to the given URL. This defaults to GET, but you
can use POST instead. We discuss the difference between these two options
later.
Here’s a small example:
This has a single form field, implemented using the input element,
tailored to the input of email addresses. This element’s name attribute
is used to provide a name for the data that the user types into the field.
The field is described using a label element. Notice how the for
attribute is used to associate the label with the form field that it describes.
The value of the label’s for attribute has to match the value of the
associated form field’s id attribute.
The form also includes an input element of type submit. This produces
a button that can be clicked to submit the form data to the specified URL.
You can use the value attribute to specify different button text.
As an alternative to <input type="submit">, you can use
<button>Submit</button>
Form Fields
Form fields that involve the input of a single line of text can be produced
using an input element with different values for the type attribute.
Besides email, which we saw above, you can use tel for the input of
telephone numbers, url for the input of URLs, number for numeric input
(either integer or floating point), etc.
Note that browsers will do some client-side validation of form input,
depending on the value chosen for the type attribute. For example, when
type is set to email, the browser will require that the input has two
parts separated by @.
Keep in mind that client-side validation is a usability feature, NOT a security feature!
It is trivial to bypass—e.g., by using a tool such as httpx to send
arbitrary data to the URL specified in the form’s action attribute.
For input of larger amounts of text, you can use a textarea element.
For selection of an item from a list of options, you can use the
select and option elements. Here’s a simple example:
Further Reading
MDN has an extensive collection of articles on creating forms.
CSS
CSS, Cascading Style Sheets, is a technology that complements HTML. Whereas HTML defines structure, CSS is focused on specifying the appearance of different HTML document elements. This specification can be embedded within an HTML document but is typically stored in a separate CSS file, supporting the design principle of ‘separation of concerns’.
As with our discussion of HTML, we will not go deeply into the details of how to use CSS, as that would require weeks of work; instead, we give you a grounding in the principles, along with pointers to where you can find out more.
Key Concepts
CSS is based around the concept of a stylesheet: a description of how an HTML document should be presented by the browser.
Stylesheets consist of a set of style rules. Each rule has the format
selector {
    property-name: property-value(s);
    ...
}
The selector is an expression that matches one or more elements in a document. Inside the braces are one or more property settings that will be applied to all the matching elements.
Each property setting consists of the property’s name, then a colon, then the value (or values) to be given to that property. A property setting is terminated with a semicolon.
We discuss selectors in more detail in the next section. For now, let’s consider the simplest possible selector: one which selects all occurrences of the given element.
Let’s suppose that you wish to target all level 1 headings, changing the font family, font size and colour used to render them. The following rule will accomplish this:
h1 {
    font-family: sans-serif;
    font-size: 2.4em;
    color: #f00;
}
Here, san-serif is a standard way of referring to the browser’s default
sans serif font. You can also name the desired font family explicitly by
providing its name in quotes, e.g., "Fira Sans", "Helvetica".
Note also how the size of the font has been specified. 2.4em is a relative
size measure, indicating a size 2.4 times larger than the base font size.
Finally, consider how text colour is defined. #f00 is an abbreviation of
#ff0000—i.e., a colour with a red component of 0xff (255) and green &
blue components of 0. CSS also supports a set of standard colour names, so we
could have used red instead here.
Now suppose that our stylesheet also had this rule:
body {
    color: blue;
}
How would this interact with the h1 rule?
Task 2.1
-
Go to the MDN Playground. Create a small HTML document containing some short paragraphs of text, along with a level 1 heading and a level 2 heading.
-
Add the
h1style rule described above. Note how the styling of only the level 1 heading changes. -
Add the
bodyrule described above. Note how the styling of the rest of the document changes, buth1remains styled as it was before. -
Now modify the
bodyrule so that it changes font size. You should see that this also influencesh1, because its style rule sets a font size relative to the base font size.
Further Reading
The MDN website provides a detailed Properties Reference. This site also has in-depth tutorials, e.g., CSS Styling Basics.
Selectors
In the previous section, we saw some examples of type selectors. Here, we introduce other kinds of selector. This is not an exhaustive review, but should give you some idea of what is possible.
Selecting Multiple Types
If you want a rule to apply to a set of different elements, use a comma-separated list of those elements as your selector. For example, to apply a rule to both level 1 and level 2 headings, you can do
h1, h2 { ... }
ID & Class Selectors
An element can be given a unique ID in an HTML document using the id
attribute, e.g.,
<span id="name">John Smith</span>
The selector for such an element uses the value of the id attribute,
preceded by a hash:
#name { ... }
This rule will apply to that one element only, and no others.
Whereas IDs are unique within a single document, classes can be applied multiple times. Consider the earlier example of recipe ingredients:
<p>To make your own pesto, you will need
  <span class="ingredient">basil</span>,
  <span class="ingredient">pine nuts</span>,
  <span class="ingredient">garlic</span> and some good
  <span class="ingredient">olive oil</span>.</p>
To target a particular class, we use the value of the class attribute
preceded by a period:
.ingredient { ... }
Note that type and class selectors can be easily combined. For example, the rule
span.ingredient { ... }
would target span elements in the ingredient class but would NOT affect
other elements that also belonged to this class.
Pseudo-Classes and Pseudo-Elements
CSS pseudo-classes are classes that automatically apply to elements that
are in particular states. For example, the :hover pseudo-class will
apply to an element when the cursor is hovering over it. We can write a
CSS rule that targets this pseudo-class in order to change the appearance
of an element when a user is about to interact with it:
CSS can also target pseudo-elements. These are not real HTML elements,
but they allow styling of particular parts of real elements. For example,
the ::first-letter and ::first-line pseudo-elements represent the first
letter and first line, respectively, of a paragraph of text. Using these
in a selector allows us to style the first letter or line differently from
the rest of a paragraph.
Contextual Selectors
Descendant
The simplest descendant selector consists of a type selector for a parent element, then a space, then a type selector for a child element. For example, we could have
ul a {
  color: green;
  text-decoration: none;
}
This would target all hyperlinks that occur within unordered lists, colouring them green and ensuring that they are not underlined.
Child
A child selector is similar to a descendant selector but is more
restrictive, as it targets direct descendants. For this, we need to use
the ‘has child’ combinator, >.
For example, suppose we have this HTML:
<h2><a href="index.html">Foobar Ltd</a></h2>
<p>
  <strong><a href="shop.html">Visit our shop</a></strong>
    or <a href="feedback.html">send us feedback</a>.
</p>
Now suppose that we style the HTML with this rule:
p > a {
  color: green;
  text-decoration: none;
}
This will match only one of the three hyperlinks, because only one of them
has the a element occurring directly within a p element.
Adjacent Sibling
The + combinator can be used to create selectors that target adjacent
siblings in the element hierarchy of an HTML document.
Consider these two CSS rules:
p {
  font-weight: bold;
}

p + p {
  font-size: small;
  font-weight: normal;
  color: purple;
}
The p selector will select all paragraphs.
The p + p selector will select any paragraph that is immediately preceded
by a paragraph. If you have a sequence of paragraphs, with no intervening
elements, it will override the p rule for all paragraphs except the first.
Task 2.2
-
Go to the MDN Playground. Enter the HTML and CSS from the child selector example above, to satisfy yourself that it behaves as described.
-
Remove the ‘has child’ combinator (the
>symbol) from the CSS rule and observe what happens. -
Clear the content from the Playground and create three
pelements in the HTML input area, containing text of your choosing. -
Add the first of the two CSS rules from the adjacent sibling example above, and observe what happens. Then add the second of the two rules.
-
Finally, try inserting a heading element in between the second and third paragraphs.
Further Reading
For more information on this topic, please see MDN’s Selectors Reference or the CSS Styling Basics tutorial.
CSS Frameworks
Responsive page layouts that work well in both desktop and mobile environments can be created from scratch in CSS, but the process can be… frustrating.
CSS frameworks provide useful shortcuts to achieving an acceptable design. Bootstrap and Tailwind are popular choices, but we will focus here on a simpler framework, Pico CSS.
Pico CSS is distributed as a bundle of CSS files that can be served from your own web server, but a more convenient alternative is to load the stylesheet from a Content Delivery Network (CDN). This can reduce bandwidth costs and will allow users of your site to benefit from upstream caching.
Using Pico via a CDN can be as easy as including this in your document head:
<link rel="stylesheet"
  href="https://cdn.jsdelivr.net/npm/@picocss/pico@2/css/pico.min.css">
This will give you a default colour theme. You will need to reference a different CSS filename if you want to use one of the other themes—see the Version Picker page and click on the theme colour of your choice to see how the filename should be changed.
You should also include the following in the head:
<meta name="viewport" content="width=device-width, initial-scale=1">
<meta name="color-scheme" content="light dark">
The first of these metadata settings ensures a properly responsive layout on mobile devices. The second ensures that both light mode and dark mode stylings are available in your site.
Finally, you should use the following as the top-level element of the
document, just inside the body element:
<main class="container">
  <!-- document content goes here -->
</main>
Task 2.3
-
Create an HTML file named
pico.html. Put the ‘starter code’ described above in the file.You can just copy the starter template from the Quick Start section of the Pico documentation if you like, but make sure you alter the
linkelement so that it loads the Pico stylesheet from a CDN. -
Add some content to the document. At minimum, this should include
- Several paragraphs of text, including hyperlinks
h1andh2headings- A form, including a button
You can add other elements (e.g., a table) if you wish.
Open the document in a web browser to see what it looks like.
-
Experiment with customizing the elements, as described in the Pico documentation. For example, try using some of the alternative styles for links and buttons.
-
Experiment with changing the page layout. Try changing the
classattribute of themainelement to becontainer-fluidinstead ofcontainer. Then try using a grid to create a two-column layout. -
Finally, experiment with some of the special components provided by Pico, again using the documentation as your guide.
(At minimum, look at the first four of the listed components, along with
nav.)
Introduction
In this section, we consider the client-server model employed by web applications. We start by looking at the basic concepts of a web client and a web server, with practical illustrations in Python. (Don’t worry: we will return to using Kotlin later…)
After that, we dig into the features of HTTP, looking at how requests and responses are structured, and how responses can be built around different content types.
Basic Concepts
There are two parts to a web-based system: a client application that issues requests, and a server that handles those requests, issuing responses to the client.
Web Clients
The typical web client is a standard web browser such as Chrome, Microsoft Edge or Safari. It is also common to have mobile apps act as web clients. In this case, the mobile app provides the UI and some front-end logic, whereas the server side delivers data to the app over HTTP, as well as dealing with things like authentication and data persistence.
Note that any piece of software can act as a web client, provided that it has the ability to establish a secure TCP connection to a web server, issue an HTTP request over that connection, and handle the resulting HTTP response.
You encountered this idea last year in COMP1850, where you wrote Python code to interact with the Pokemon API over HTTP.
Here’s a simple example of a Python web client:
import httpx

response = httpx.get("https://example.com/")

print(response.text)
This code uses the httpx library to issue a request for the home page
of the web server with domain name example.com. It prints the content of
the response obtained from the server, assuming it to have a text rather than
binary format.
A Simple Web Server
At its most basic, a web server
- Listens on a particular TCP port for incoming HTTP requests
- Handles each request in an appropriate manner, depending on its associated URL
- Delivers an HTTP response back to the client
If the URL references a specific HTML document, handling the request can be as simple as reading that document from disk and sending the contents back to the client1. This is known as a static response, because repeated requests will give rise to the same content being delivered every time (at least, until the document is changed on disk). A dynamic response, which can vary between requests, is also possible. Dynamic responses are common in database-driven applications.
Task 3.1
-
Create a file
test.htmlcontaining the following:<!DOCTYPE html> <html lang="en"> <head> <title>Test Document</title> </head> <body> <h1>Test Document</h1> <p>Hello World!</p> </body> </html> -
Open a terminal, move to the directory containing
test.html, and run the web server provided in the Python standard library, like this2:python -m http.server -
In a browser, try visiting this URL:
http://0.0.0.0:8000/test.htmlYou should see the test document rendered in the browser window.
-
Look at the message log displayed in the terminal window. You should see a GET request logged for
test.html. -
Terminate the server using
Ctrl+C.
This is a toy server, suitable for experimentation but not for production use!
It is not secure and has none of the features that would make it appropriate to use in a real web application.
Real Web Applications
A web server can run as a single process, dealing with all aspects of request handling itself, but in practice the server side of a web application often has a more complicated architecture.
For example, some web applications will use a standard web server such as Apache or Nginx to serve requests for static resources such as HTML, CSS and images, whilst using a separate application server to provide dynamic responses. There are standards for how web servers and application servers communicate—e.g., WSGI in Python.
Heavily-used web applications may need to provide a server farm consisting of several replica web servers. In such a system, requests go first to a load balancer which distributes requests amongst the replicas, to ensure that none of them get too overloaded.
Many web applications are database-driven, so a database server will often feature as a key element of the server-side architecture. These applications may also employ a separate caching server such as memcached or Redis to cache the results of potentially expensive queries.
-
Note that an HTML document will most likely reference additional resources such as stylesheets and images. If the client is a browser then further requests will need to be made for these resources before the document can be rendered fully. ↩
-
If this doesn’t work, you might need to use the command
python3instead. If that doesn’t work, check that Python 3 is accessible on the system that you are using. ↩
HTTP Requests
An HTTP request consists of multiple lines, each terminated with a carriage return character (CR) followed by a line feed character (LF). It begins with a request line. This line starts with a request method1, specifying the action to be performed on a resource. This is followed by a Uniform Resource Identifier (URI)2, a string that identifies the resource on which the method will operate. The line ends with a string identifying the protocol being used.
For example, consider
GET /index.html HTTP/1.1
This uses version 1.1 of the protocol and invokes the GET method (see below),
requesting the resource index.html located at the root of the tree of
documents managed by the web server handling this request.
After the request line comes the header, consisting of one or more lines that specify header fields. Each field consists of a case-insensitive field name, followed by a colon, followed by the field’s value. At a minimum, there will be a header field like this:
Host: www.example.com
This provides the domain name of the web server to which the request has been directed.
The third required element of a request is an empty line—i.e., a line that consists only of the CR and LF characters.
The fourth element, a message body, is optional. Many requests won’t have a body, but if data needs to be sent with a request, the body is typically where it goes. For example, if a form on a web page makes a POST request, the contents of the form will be included in the message body.
GET & POST Methods
The most common methods encountered in web applications are GET and POST.
The GET method is designed to fetch a resource from the server without changing anything on the server. GET requests should not contain a body, but can still carry limited amounts of data from client to server by encoding that data into the URL.
For example, a search form on a web page could send the chosen search term to the server by encoding it into the URL of a GET request. The server would respond with the results of the search. Nothing would change on the server as a result of doing the search.
The POST method can be used to send data, encoded in the message body,
to the server. The type of data being sent is specified using the
Content-Type header field.
POST is most commonly used when sending form data from a browser to a server, where the intention is for the server to be somehow modified as a result. For example, if a user is registering as a new customer of an e-commerce site, then the database on the server side will be modified as a result of user registration, so POST should be used to deliver the details that they have entered into the registration form.
Task 3.2
-
Create a file named
form.html, containing the following:<!DOCTYPE html> <html lang="en"> <head> <title>Form Demo</title> </head> <body> <h1>Form Demo</h1> <form method="GET" action="https://httpbin.io/dump/request"> <label for="email_id">Enter your email:</label> <input id="email_id" type="email" name="email"> <input type="submit" value="Subscribe!"> </form> </body> </html> -
Open this file in a web browser. Enter an email address in the input field and click the Subscribe button. The server should echo the details of the request back to the browser.
Look at the first line of the response. This shows you the request line of the browser’s original GET request. You should see something like the following, where the specified email address has been encoded into the URL, after the
?character:GET /dump/request?email=nick%40example.com HTTP/1.1The
%40is the URL encoding of the@character. This is needed because there are restrictions on the characters allowed in URLs.You should see only HTTP headers displayed. There is no body supplied with a GET request.
-
Click the Page Refresh button of the browser. This will resubmit the request made by the form. You should see the
Cache-Controlheader appear the first time you do this. The browser has recognized that this is a repeat of an earlier request, and the header essentially instructs the server not to use a previously cached result.The key point here is that resubmission of the request was immediately allowed. This is probably NOT what you want to happen if form submission is supposed to modify a database on the server side!
-
Now edit
form.html, changingmethod="GET"tomethod="POST". Reload the file in the browser and try submitting again from the form.This time, notice that the request line no longer contains the form data:
POST /dump/request HTTP/1.1If you look at the bottom of the page, you should see the request now has a body, consisting of the form data:
email=nick%40example.com -
Click the Page Refresh button. This time, you should get a warning from the browser to confirm form resubmission.
Browsers display this warning because POST requests are expected to change things on the server, so an accidental page refresh might have undesirable consequences such as updating a database twice.
Other Methods
There are seven other HTTP methods. We discuss three of them briefly below.
HEAD
The HEAD method behaves like GET, except that it retrieves only the response header and not the content of the requested resource. This allows a web client to access the metadata of that resource without having to download a potentially large amount of data.
For example, you could use a HEAD request to find out how big a video file is and check there is sufficient space for it before attempting to download it using a GET request.
PUT
The PUT method creates a new resource on the server using the content provided in the request body, or it replaces the specified resource with the content provided in the request body. Note that browsers do not make PUT requests; they use POST to send data back to a server.
Unlike POST, PUT requests are idempotent, meaning that the effect of making the same PUT request multiple times is no different than the effect of making it once.
A PUT request will trigger one of three possible responses if it succeeds:
-
A
201 Createdresponse means that a new resource was created. The response header will include aContent-Locationfield confirming the location. -
A
204 No Contentor200 OKresponse means that the resource already existed and it was modified using the data provided in the request.
DELETE
The DELETE method requests that the server delete the specified resource. Like PUT, it isn’t used by browsers, but is intended for use by other kinds of web client.
A DELETE request will trigger one of three possible responses if it succeeds:
-
A
200 OKresponse means that deletion succeeded, with further information provided via the response body. -
A
202 Acceptedresponse means that deletion is pending and will probably succeed, with further information provided via the response body. -
A
204 No Contentresponse means that deletion succeeded but no further information has been provided via the response body.
-
HTTP methods are sometimes described as verbs, underlining the fact that they represent actions to be performed by the server. ↩
-
URIs are a more general concept than URLs. A URL (Uniform Resource Locator) refers specifically to a resource located on a network or filesystem. Every URL is also a URI, but the reverse is not necessarily true. ↩
HTTP Responses
An HTTP response consists of multiple lines, each terminated by a carriage return character (CR) and line feed character (LF). It begins with a status line, giving the version of HTTP that was used, a three-digit status code to indicate success or failure, and an optional phrase to explain the status code.
A status code of 200 indicates that the request was handled successfully. Codes beginning with a 4 indicate an error in the request made by the client. Codes beginning with a 5 indicate an error on the server side.
After the status line are zero or more lines of header, each specifying a separate header field. A header field consists of the field’s name (case-insensitive), a colon, and the field’s value.
The third element is an empty line, i.e., a line that contains only the CR and LF characters.
The final element is the message body. This contains the content of the response. Everything prior to the message body is text, but the message body can be text (e.g., an HTML document or a stylesheet) or binary data (e.g., an image or a video file).
Task 3.3
-
Open a terminal window. In that terminal, follow the installation instructions on the uv website to install the uv project manager tool.
-
Create a directory in which to do this task,
cdinto it, then enteruv init -
Install the httpx library and command line interface with
uv add 'httpx[cli]'This will create a virtual environment containing the software. Activate this environment now by entering
source .venv/bin/activateYou can deactivate this environment at any time simply by entering
deactivate, but don’t do this yet! -
You should now be able to use httpx on the command line to make a GET request to example.com:
httpx https://www.example.comThe httpx tool will display the entirety of the HTTP response issued by the example.com web server. Take a look at the first line:
HTTP/1.1 200 OKThis identifies the version of the protocol used by client & server, and provides a status code and message. A status code of 200 indicates that the request succeeded.
The next eleven lines are the header of the response. Take a look at each of these lines in turn. Use the list of response header fields to help you understand what each of them represents.
Note, in particular,
Content-Type, set totext/html, indicating an HTML documentContent-Encoding, set togzip, indicating that content has been compressedContent-Length, set to 363 bytes (the compressed size of the content)Connection, set tokeep-alive
That
keep-alivevalue indicates that the server is keeping the TCP connection active, allowing it to be reused by subsequent GET requests that might be needed to retrieve further resources such as stylesheets or images. Without this, a separate TCP connection would be made for every one of these requests, slowing down your web browsing considerably!After the last line of the header is a single empty line, followed by the content itself. You can see that this is HTML.
-
Now repeat the request, but this time ask for more verbose output by adding the
-voption to the end of the command:httpx https://www.example.com -vNow you will see additional output displayed before the details of the response.
The lines beginning with
*appear here because the connection to the server is protected by Transport Layer Security (thehttpsat the start of the URL tells you that this is happening). If you look at these lines, you’ll see details of the cipher and hash function used to secure the connection, plus information about the TLS certificate that the server uses to authenticate itself to clients. -
After the lines dealing with TLS, you should see details of the request, starting with
GET / HTTP/1.1which indicates a GET request for the site’s home page, using version 1.1 of HTTP.
After this comes the request header. Study each of these five lines, using the list of request header fields to help you understand their purpose.
Content Types
An important part of the HTTP request-response cycle is the negotiation of content types.
A web client signals the content types it can handle by including the
Accept header in a request. Types are specified in a standard
way, with a type/subtype format. Wildcards can be used in either
part of this format to represent ‘any type’.
For example,
Accept: text/html
indicates that the client is prepared to accept HTML documents, whereas
Accept: text/*
indicates that the client can handle any kind of text document, and
Accept: */*
indicates its willingness to handle any type of content.
Given the hints provided by a client, the server can make an appropriate choice of which type of content it delivers in response.
Here are some examples of common content type specifications:
| Type | Description |
|---|---|
application/json | Data in the JSON format |
application/pdf | PDF document |
image/jpeg | JPEG image |
image/png | PNG image |
image/svg+xml | Scalable Vector Graphics, in XML format |
text/css | Cascading Style Sheet |
text/csv | Data in the CSV format |
text/html | HTML document |
text/plain | Plain text |
text/xml | XML document |
video/quicktime | Quicktime movie file |
Task 3.4
-
Return to the directory that you created in Task 3.3—the one in which you installed httpx using the uv project manager tool. In this directory, activate the virtual environment with
source .venv/bin/activate(or the Windows equivalent if you are using that OS)
-
Make the following GET request using httpx:
httpx https://httpbin.io/htmlNotice the
Content-Typefield in the response header, set totext/html. You can also see that the content is clearly an HTML document. -
Now make a GET request for something different:
httpx https://httpbin.io/imageNotice that the server responds with
415 UNSUPPORTED MEDIA TYPE, indicating that it did not receive enough information from the client about acceptable media types, and it wasn’t willing to choose a default media type from the options available. -
Now try the following:
httpx https://httpbin.io/image --headers Accept image/pngThis adds
Accept: image/pngto the header of the GET request. You should see a200 OKresponse from the server.The httpx tool won’t attempt to display the image because you are running the command in a terminal. Instead, it will show you the size of the content that was included with the response. You can save this content to a file by adding this option to the end of the command:
--download test.pngTry this out and look at the image that is downloaded.
-
Repeat the above using
image/jpegas the accepted media type. You should see that a different image is downloaded. -
Finally, try making the following GET request:
httpx https://httpbin.io/jsonNotice that the response has a content type of
application/json, and that it clearly contains JSON data rather than HTML or some other kind of content.This is typical of how a native app on a mobile device might interact with a server. The job of the server in such cases is not to deliver the UI to a web browser; instead, the app provides the UI and the server provides the data that the app will display in that UI.
Ktor
Ktor is a powerful Kotlin framework for building client-server applications.
We focus here on the server side of things. We will show how Ktor can be used to build a classic web server that delivers static HTML or dynamically constructed HTML to a browser. We will also show how a Ktor server can be tested, using Kotest to handle the assertions.
Ktor can be used in many other ways that we will not cover here—e.g., to create WebSocket applications that support real-time data exchange between client and server. You should consult the Ktor documentation if you want to know more about these advanced topics.
There are some GitHub repositories that may be of interest if you wish to dig deeper into Ktor:
-
awesome-ktor is a curated list of links to Ktor resources
-
ktor-samples is a collection of various example applications
-
The ktor-documentation repository has a huge set of code snippets demonstrating how to accomplish many of the things you might need to do in a Ktor application
You may find these helpful when working on your group projects in Semester 2…
Bootstrapping With Amper
The Amper build tool offers perhaps the simplest way of bootstrapping a Ktor application.
In this section, we walk you through the process of using Amper to set up and run a basic ‘Hello World’ server, and we explain what the different elements of the application do.
You can use this ‘Hello World’ project as the starting point for your own Ktor applications, or you can use other project creation tools if you prefer.
Task 4.1
Setting Up
-
Create a new directory for the application. Copy into that directory the Amper script1 from one of the earlier Kotlin programming tasks (e.g., Task 1.5, ‘Using Amper’).
Make sure that your version of Amper is up to date, with
./amper update(Adjust this and subsequent commands as necessary if you are on a Windows system.)
-
Initialize the project by entering
./amper initWhen the list of options appears, use the arrow keys to move down until ‘Ktor server application’ is selected, then press Enter.
Amper will now create the project structure and configuration files needed by Ktor, as well as the source code for a “Hello World” server.
-
Examine the contents of the YAML file
module.yaml:product: jvm/app settings: ktor: enabled jvm: mainClass: org.jetbrains.amper.ktor.ApplicationKt dependencies: - $ktor.server.core - $ktor.server.netty - $ktor.server.configYaml - ch.qos.logback:logback-classic:1.5.18 test-dependencies: - $ktor.server.testHostThis file uses the
mainClasssetting to specify the application entry point. The source code file corresponding to this entry point isApplication.kt, in thesrcdirectory.Note: in a real project, you should change that package name
org.jetbrains.amper.ktorto something more appropriate, both here and in the source code files.Notice also how
module.yamlspecifies a number of dependencies:- The core library needed by Ktor server applications
- The Netty framework, which provides all the low-level networking functionality
- A library to support server configuration using YAML files
- A logging library
- A server testing library
Different options are available for some of these dependencies. For example, you don’t have to build your application on top of the Netty server framework; you could use Eclipse Jetty instead.
-
Now look in the
resourcesdirectory. This holds two files,application.yamlandlogback.xml. The first of these is a YAML file containing the run-time configuration for the application itself:ktor: application: modules: - org.jetbrains.amper.ktor.ApplicationKt.module deployment: port: 8080This particular configuration states that the server will listen on port 8080 once deployed. It also identifies a module in the Ktor application.
Ktor applications have a modular structure, in which different aspects of the implementation are handled by distinct modules. A Ktor module is simply an extension function that you plug in to the
Applicationclass that represents the whole application.These modules can be listed individually in the
modules:section of the YAML file; alternatively, you can just link to a single module from the YAML file and then have that function make calls to the various other modules that make up the application. The latter approach is used here.The other file,
logback.xml, configures how logging is done by the application. If want you to change the amount of logging that is done, or change the format of the logged messages, you can do so by editing this file. -
The last part of the project that we must examine is the
srcdirectory. This holds two source code files,Application.ktandRouting.kt.Application.ktcontains these functions:fun main(args: Array<String>) { io.ktor.server.netty.EngineMain.main(args) } fun Application.module() { configureRouting() }The first is the standard
main()function of any Kotlin application. Its primary purpose is to start up the underlying Netty server.The second function, named
module(), is the extension function referenced fromapplication.yaml. This function will be called automatically as the server starts up. In this case, all it does is invoke another module, namedconfigureRouting().The implementation of
configureRouting()can be found inRouting.kt:fun Application.configureRouting() { routing { get("/") { call.respondText("Hello World!") } } }Again, note that this is an extension function of the
Applicationclass.This sets up a single route for the application. This route handles GET requests for a relative URL of “/” (in effect, the application’s ‘home page’). The response issued for such a request is to send back some plain text content, the message
Hello World!The variable named
callreferences an object of typeRoutingCall. You can invoke various methods on this object in order to have the server deliver different types of response to the client that made the request.In this case, the server responds with plain text, but you can also use other functions here. For example,
respondHtml()will send dynamically constructed HTML,respondTemplate()will render the response using a template engine, andrespondBytes()will send binary data generated by the application.
Building & Running
-
Use this command to build the application:
./amper build -
Now run the server like this:
./amper runYou should see a couple of logging messages appear in the terminal, telling you that the application has started up and giving you a URL you can use to interact with it.
In a web browser, visit
http://0.0.0.0:8080You should see
Hello Worldappear in the browser window. -
Open another terminal window and go back to the directory where you previously installed httpx. In this directory, activate the virtual environment and then run the httpx tool with
httpx -v http://0.0.0.0:8080This will show you the full details of the GET request issued by httpx, and the response issued by the Ktor application.
-
Finally, return to the terminal window in which you ran the server, and terminate it by pressing
Ctrl+C.
-
The script is the file named
amper(oramper.batif you are using Windows). ↩
Other Project Creation Tools
There are several other ways of setting up a Ktor server project. You can
If there are specific features that you require your server to have, these methods will probably be more convenient than bootstrapping with Amper, as they will add the required dependencies to the build configuration, as well as including relevant example code in the project.
Ktor Project Generator
This is a web-based tool, hosted at https://start.ktor.io/. It will create a Zip archive containing your Ktor project, which you can then download.
Try this out now. Visit the site and follow the instructions below:
-
At the top of the page, put something appropriate in the ‘Project artifact’ input field.
The last part of this identifier (after the final
.) is used as the project name and the name of the Zip archive that you will download.The first part of the identifier is used as a the package name for your code. Typically, this is a reversed domain name. You can leave it set to
com.examplefor the purposes of experimentation, but should use something more appropriate in real projects. -
Click on the Configure button to specified build system, Ktor version, Underlying server engine, and configuration file format.
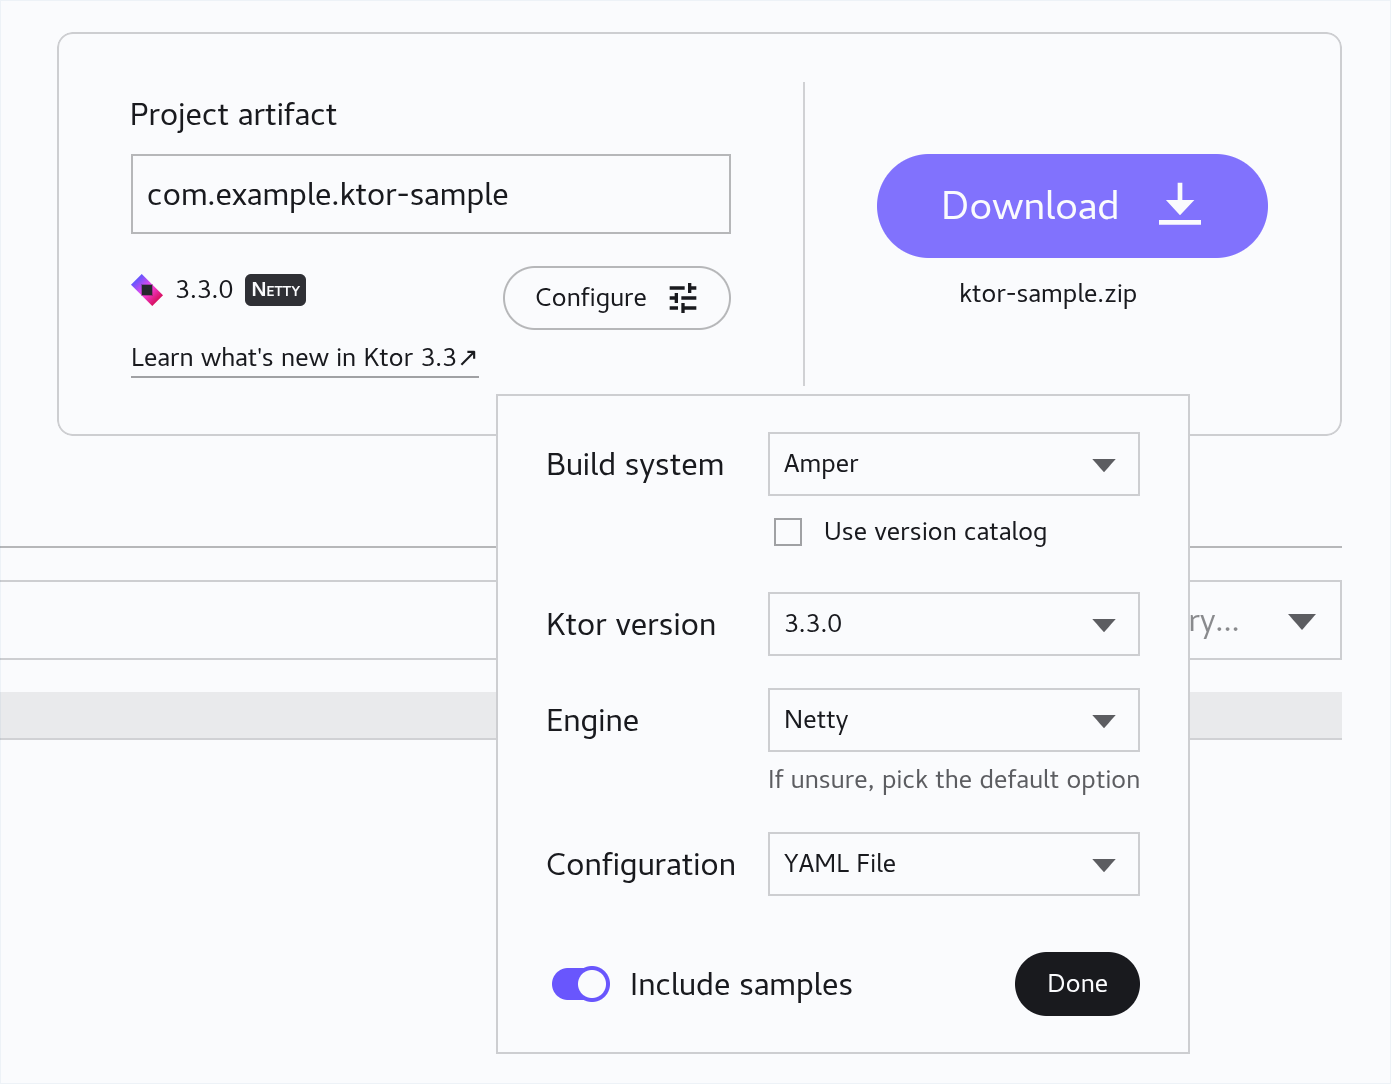
We strongly recommend setting the build system to either ‘Gradle Kotlin’ or ‘Amper’, as these are the two systems you are already familiar with.
Make sure ‘Ktor version’ is set to the highest available (currently 3.3).
You can leave the Engine set to the default of Netty, or change it to Jetty if you prefer.
Set the ‘Configuration’ option either to YAML File or HOCON File, as you wish. (HOCON is ‘Human-Optimized Configuration Object Notation’, a JSON-like syntax for writing configuration files. You may prefer this to the less explicit style of YAML.)
You can also indicate whether you want sample code to be included in the project or not. Leave this enabled for now, then click Done.
-
Select the ‘Plugins’ tab and scroll down the list of plugins. Select a plugin to see more information about it, and click the Add button to add it to the project.
-
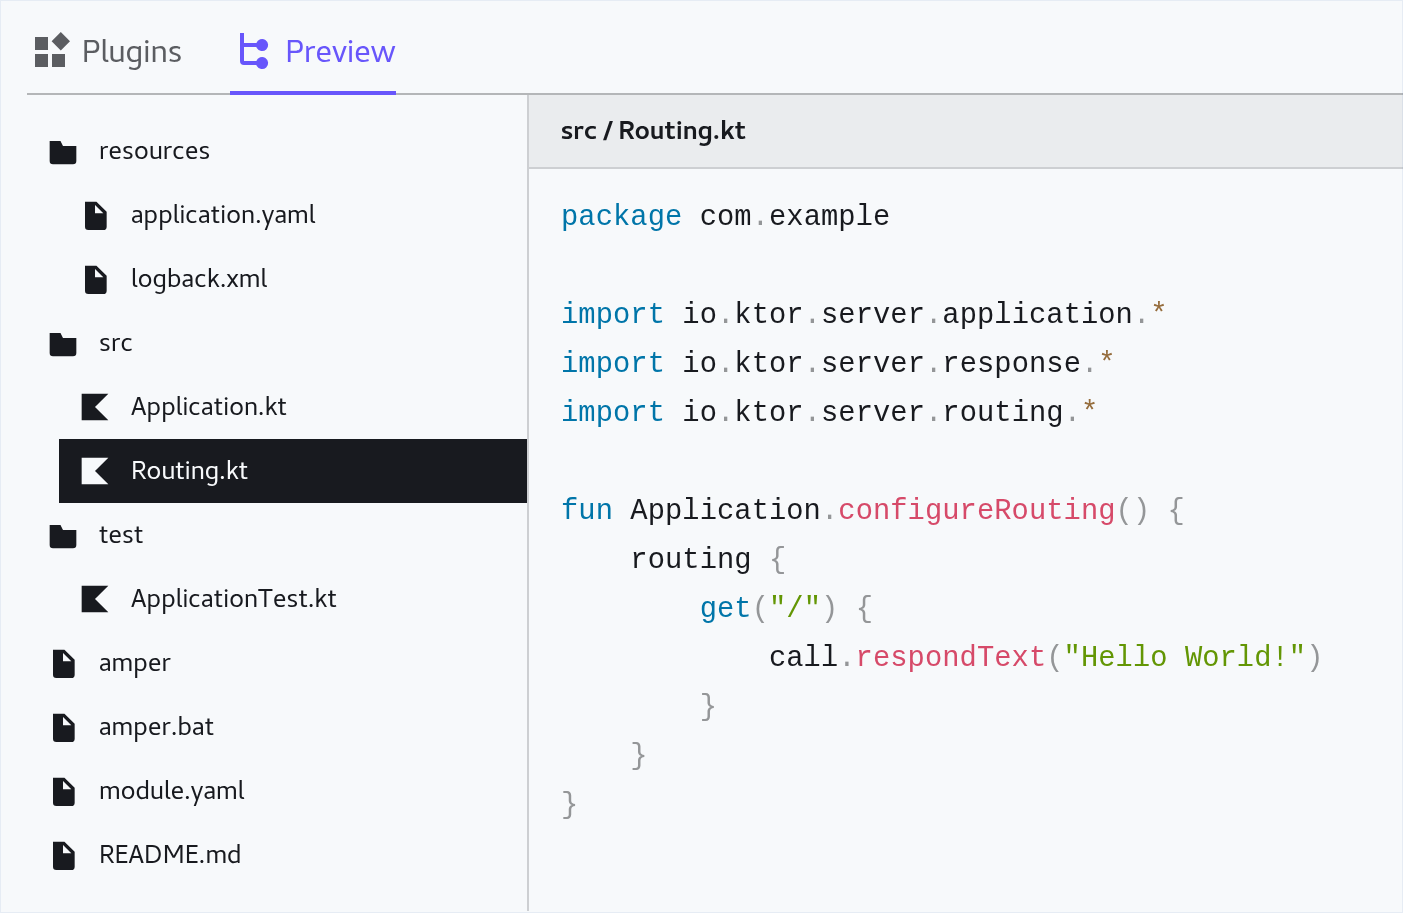
Select the ‘Preview’ tab to see a preview of the project structure. You can click on any file to see its contents.
-
If you are happy with the generated files, click the Download button at the top-right of the page to download a Zip archive containing your Ktor project.
Ktor CLI
This is a tool that you must download and run in the terminal, on your own PC. It provides equivalent functionality to the web-based tool, but may be a little quicker to use.
The tool works on Linux, macOS and Windows. See the Ktor documentation for further details on how to install and run it.
IntelliJ Ktor Plugin
If you have the full ‘Ultimate’ edition of the IntelliJ IDE installed on your own PC1, you can create a Ktor project via the following process:
-
On the Welcome screen, click the New Project button.
-
On the ‘New Project’ dialog, specify a name and a parent directory for the project, in the Name and Location fields.
-
In the Group field, specify a package name prefix.
Note: IntelliJ requires that you supply something here. You can stick with the default if you want, but in real projects it is better to use something unique (e.g, a reversed domain name).
-
If you don’t wish to use Netty as the underlying engine of your server application, select a different option from the drop-down box.
-
Leave the ‘Add sample code’ checkbox checked or uncheck it, as you prefer.
-
Under ‘Advanced Settings’, choose your preferred build system. We strongly recommend selecting either ‘Gradle Kotlin’ or ‘Amper’, as these are the two systems you are already familiar with.
Make sure ‘Ktor version’ is set to the highest available (currently 3.3).
Set the ‘Configuration’ option either to YAML or HOCON, as you wish. (HOCON is ‘Human-Optimized Configuration Object Notation’—a JSON-like syntax for writing configuration files. You may prefer this to the less explicit style of YAML.)
-
Click Next. On the next page of the dialog, scroll down the list of plugins, clicking the Add button for any that you want to include in the project.
-
When you’ve added all the plugins you require, click Create to finally create the project.
-
You can use the ‘Ultimate’ edition of IntelliJ for free if you have obtained a student license. ↩
Serving HTML
There are three different ways in which you can serve HTML content from a Ktor application. We explore two of them below. The third approach, using templates, will be covered later.
Serving Static Files
You can serve static content from three different places:
- The filesystem
- A Zip archive
- The application classpath
The first two of these are configured using the staticFiles() and
staticZip() functions, respectively. The third option is configured using
the staticResources() function.
These functions are all called as part of setting up the routing of the application.
Let’s experiment with the third option.
-
Download
ktor-static.zipfrom the Topic 2 folder in Minerva, then unzip this archive in your SoCS Linux filestore or your own PC. -
Examine the contents of the directory that is created. This is an Amper project for a very basic Ktor application. Take a look at
Routing.ktand you can see thatstaticResources()has been used:fun Application.configureRouting() { routing { staticResources("/", "static") } }This declares that Ktor should try to satisfy GET requests by serving content from a directory named
static, located in the application classpath, alongside the code of the application.Because there is no other routing declared here using
get()or other request handling functions, all requests will be treated as if they are for static resources; in other words, this Ktor server will function like a classic web server, serving HTML, CSS, images and other files. -
Run the application with
./amper run(Note: this is for Linux & macOS; adjust this and subsequent commands as necessary if you are using Windows.)
If you try visiting the application home page you should get a
404 Not Founderror, because there are as yet no HTML files.Stop the server with
Ctrl+C. -
Create a file named
index.html, in the directoryresources/static. Any files that we want our server to use should be placed here. They are not served from here at runtime, but this is where they have go so that they are bundled with the application code whenever it is compiled.In
index.html, create a web page. Use the Pico CSS framework to style it nicely, and include an image or two. Remember that you will also need to put the image files in thestaticsubdirectory. -
Rebuild the application with
./amper buildExamine the contents of
build/tasks/_ktor-static_compileJvm. You should see the.classfiles of the application here, along with astaticsubdirectory containingindex.htmland any image files that you added. -
Run the application with
./amper runVisit
http://0.0.0.0:8080again and you should now see a nicely styled web page.
Constructing HTML Dynamically
Another approach is to create a response dynamically using Kotlin code. The
kotlinx.html library provides a neat way of doing this. It defines a
domain-specific language (DSL) for building HTML documents. Ktor
integrates this approach and allows you to use it, in conjunction with the
respondHtml() function, to issue HTML documents as responses to a request.
Let’s examine a demo application.
-
Download
ktor-html.zipfrom the Topic 2 folder in Minerva, then unzip this archive in your SoCS Linux filestore or your own PC. -
Examine the contents of the directory that is created. This is another Amper-based Ktor project, a small web application that simulates die rolls.
If you look at
Routing.ktyou’ll see that it defines a single route for GET requests with URLs that match/roll/dfollowed by the number of die sides.routing { get("/roll/d{sides}") { val sides: Int by call.parameters val number = dieRoll(sides) call.respondHtml(HttpStatusCode.OK) { head { title { +"Dice Roller" } } body { h1 { +"d${sides} Dice Roll" } p { +"Result = $number" } } } } }The first thing done to handle the request is link the parameters of the call (the data encoded into the URL or request body) with variables. In this case, there is just the one variable,
sides. Thebykeyword indicates that this is done using Kotlin’s delegated properties feature.After this, a function is called to roll the die (see
Dice.ktfor its implementation). Then an HTML page giving the result of the die roll is built, using the DSL mentioned earlier. Notice how Kotlin syntax is used to build a nested structure of HTML elements here. -
Run the application with
./amper runVisit
http://0.0.0.0:8080/roll/d20in your browser to see the response created by the application. Refresh the page to roll a d20 again.Use your browser’s ‘View Page Source’ feature to examine the raw HTML.
-
Try changing the number of die sides to one of the other allowed values (4, 6, 8, 10, 12). Then investigate what happens if you specify an invalid number, or provide something that isn’t a number at all. Why do you think the server doesn’t crash when you do this?
-
Experiment with modifying the HTML of the die roll results page or the error page, so that you can get a feel for this DSL-based approach.
Testing Servers
Ktor provides some support for testing your server applications in an efficient way. It hooks tests directly into the framework’s routing mechanism, avoiding the need to run the underlying server and make network calls to it. This allows the tests to run a lot faster.
Task 4.4
-
Download
ktor-testing.zipfrom the Topic 2 folder in Minerva and unzip it in your SoCS Linux filestore or on your own PC. -
Examine the contents of the directory that is created. This is a Gradle project for a simple ‘Hello World’ Ktor application. Take a look at the
build.gradle.ktsfile. Notice the addition of three testing dependencies:testImplementation("io.ktor:ktor-server-test-host") testImplementation("io.kotest:kotest-assertions-core:5.9.1") testImplementation("io.kotest:kotest-runner-junit5:5.9.1")You’ve seen the two Kotest dependencies before. The other dependency extends Ktor with the testing support that we need.
-
Run the application with
./gradlew runVisiting
http://0.0.0.0:7070should give you a “Hello World!” message in the browser window.Try visiting
http://0.0.0.0:7070/hello/Kotlinand you should see a “Hello Kotlin!” message instead. -
Now run the tests:
./gradlew testA single test should run, and it should pass.
-
Locate the file
ApplicationTest.ktand examine it. Here’s the code for the single test:"Path / yields 'Hello World!' greeting" { testApplication { application { module() } val response = client.get("/") response.status shouldBe HttpStatusCode.OK response.headers["Content-Type"]?.shouldContain("text/plain") response.bodyAsText() shouldBe "Hello World!" } }This is similar to the Kotest examples you’ve seen earlier, but there are some important differences.
-
The body of the test is contained in a lambda expression which is passed to the
testApplication()function. -
The first thing in this lambda expression is some code to configure the application, invoking its top-level
module()function. (Remember that this, in turn, may invoke other modules, such asconfigureRouting().) -
The second thing in the lambda expression is some code to make a request. A GET request can be made by invoking the
get()extension function of a special object namedclient. A POST request can be made by invoking thepost()function. The request returns a response, and we can make assertions about the content of this response. -
The assertions have a form that should now be familiar to you. In this example, you can see how we can check three features of the HTTP response: the status code, the
Content-Typeheader, and the body.-
Notice how we use the object
HttpStatusCode.OKto represent a status of200 OK. There are constants like this defined for all other HTTP status codes. -
Notice the use of the safe call operator when checking for the
Content-Typeheader. This is becauseresponse.headersstores headers in a map, and looking up values in a map can returnnull. -
The body of the response needs to be converted explicitly into a string before we can check it, which is achieved using the
bodyAsText()extension function.
-
-
-
The application has two routes, but only one of them is currently tested. Add the missing test to
ApplicationTest.kt. Rerun the tests and make sure that both pass. -
Add a third test to check that a request for
http://0.0.0.0:7070/helloproduces a404 Not Foundresponse.
Further Reading
For more on how to test your applications, see the Testing in Ktor Server page in the official Ktor documentation.
The approach outlined above is suitable for testing only the request-handling code of a Ktor server. If you want to test all layers of software running on the server side, you could use Ktor to create a separate client application that makes a network request to a running server. This application could then make assertions about the response that it receives.
For full end-to-end testing of web applications in a browser, you should investigate tools like Playwright. This may come in handy for your project in Semester 2.